

How to Create a PWA
PWA or Progressive Web App is a way to bring your website to a native app.


PWA can enhance a website with mobile or any platform-specific features which increase usability and user experience. PWA delivers an app-like experience to users by using modern web capabilities. It's Just your app that runs in a singleton browser with some enhancements.
PWA give your website special abilities like
- Push Notification Support
- Access native operative system features
- Installable in any operating system
- offline working
- Background Synchronization etc
Let's build a very basic PWA, with this information you can create PWA for any web application. We need to do a couple of things to make our web project as PWA
For Testing purposes, you can have any simple HTML, CSS, and JavaScript app. if you have one you can skip this step of creating a basic website.
Index.html
<!DOCTYPE html>
<html lang="en">
  <head>
    <meta charset="UTF-8" />
    <meta http-equiv="X-UA-Compatible" content="IE=edge" />
    <meta name="viewport" content="width=device-width, initial-scale=1.0" />
    <link
      rel="shortcut icon"
      href="https://kingtechnologies.in/assets/images/Logo.webp"
      type="image/x-icon"
    />
    <title>King Technology - PWA Template</title>
    <link rel="stylesheet" href="style.css" />
  </head>

  <body>
    <h1>King Technologies</h1>
    <a href="./page-2.html">Page 2</a>
    <h2>PWA Template</h2>
    <button class="accordion" type="button">Section 1</button>
    <div class="panel">
      <p>
        Lorem ipsum dolor sit amet, consectetur adipisicing elit. Sint vero,
        magnam cupiditate eveniet possimus autem. Dolor reprehenderit, quae,
        necessitatibus voluptatibus, magni autem minima sequi cupiditate
        voluptate optio voluptatum deserunt est?
      </p>
    </div>
    <button class="accordion" type="button">Section 2</button>
    <div class="panel">
      <p>
        Lorem ipsum dolor sit amet, consectetur adipisicing elit. Sint vero,
        magnam cupiditate eveniet possimus autem. Dolor reprehenderit, quae,
        necessitatibus voluptatibus, magni autem minima sequi cupiditate
        voluptate optio voluptatum deserunt est?
      </p>
    </div>
    <button class="accordion" type="button">Section 3</button>
    <div class="panel">
      <p>
        Lorem ipsum dolor sit amet, consectetur adipisicing elit. Sint vero,
        magnam cupiditate eveniet possimus autem. Dolor reprehenderit, quae,
        necessitatibus voluptatibus, magni autem minima sequi cupiditate
        voluptate optio voluptatum deserunt est?
      </p>
    </div>
    <script src="script.js"></script>
  </body>
</html>
page-2.html
<!DOCTYPE html>
<html lang="en">
  <head>
    <meta charset="UTF-8" />
    <meta http-equiv="X-UA-Compatible" content="IE=edge" />
    <meta name="viewport" content="width=device-width, initial-scale=1.0" />
    <link
      rel="shortcut icon"
      href="https://kingtechnologies.in/assets/images/Logo.webp"
      type="image/x-icon"
    />
    <title>Page 2 - PWA Template</title>
    <link rel="stylesheet" href="style.css" />
  </head>

  <body>
    <h1>King Technologies</h1>
    <a href="./index.html">Back</a>
  </body>
</html>
Style.css
a {
  text-decoration: none;
}

body {
  margin: 50px auto;
  font-weight: 400;
  text-align: center;
}

h1 {
  font-weight: lighter;
  font-size: 50px;
}

button.accordion {
  background: #dd1c1a;
  color: #fff;
  cursor: pointer;
  border: 0px;
  padding: 18px;
  width: 70%;
  text-align: left;
  font-size: 18px;
  transition: 0.4s;
}

button:focus {
  outline: none;
}

button.accordion.active,
button.accordion:hover {
  background: #9b0a07;
}

div.panel {
  padding: 0 18px;
  color: #000;
  max-height: 0;
  overflow: hidden;
  width: 67.45%;
  margin: 0 auto;
  transition: max-height 0.2s ease-out;
}
Script.js
var acc = document.getElementsByClassName("accordion");
var i;
for (i = 0; i < acc.length; i++) {
    acc[i].onclick = function () {
        this.classList.toggle("active");
        var panel = this.nextElementSibling;
        if (panel.style.maxHeight) {
            panel.style.maxHeight = null;
        } else {
            panel.style.maxHeight = panel.scrollHeight + "px";
        }
    };
}
That is a simple animated accordion app that we will convert into PWA, I created a simple app because it will make our focus on PWA. Not in HTML, CSS or JS.
Now Let's start making it to a PWA
Add a web app manifest
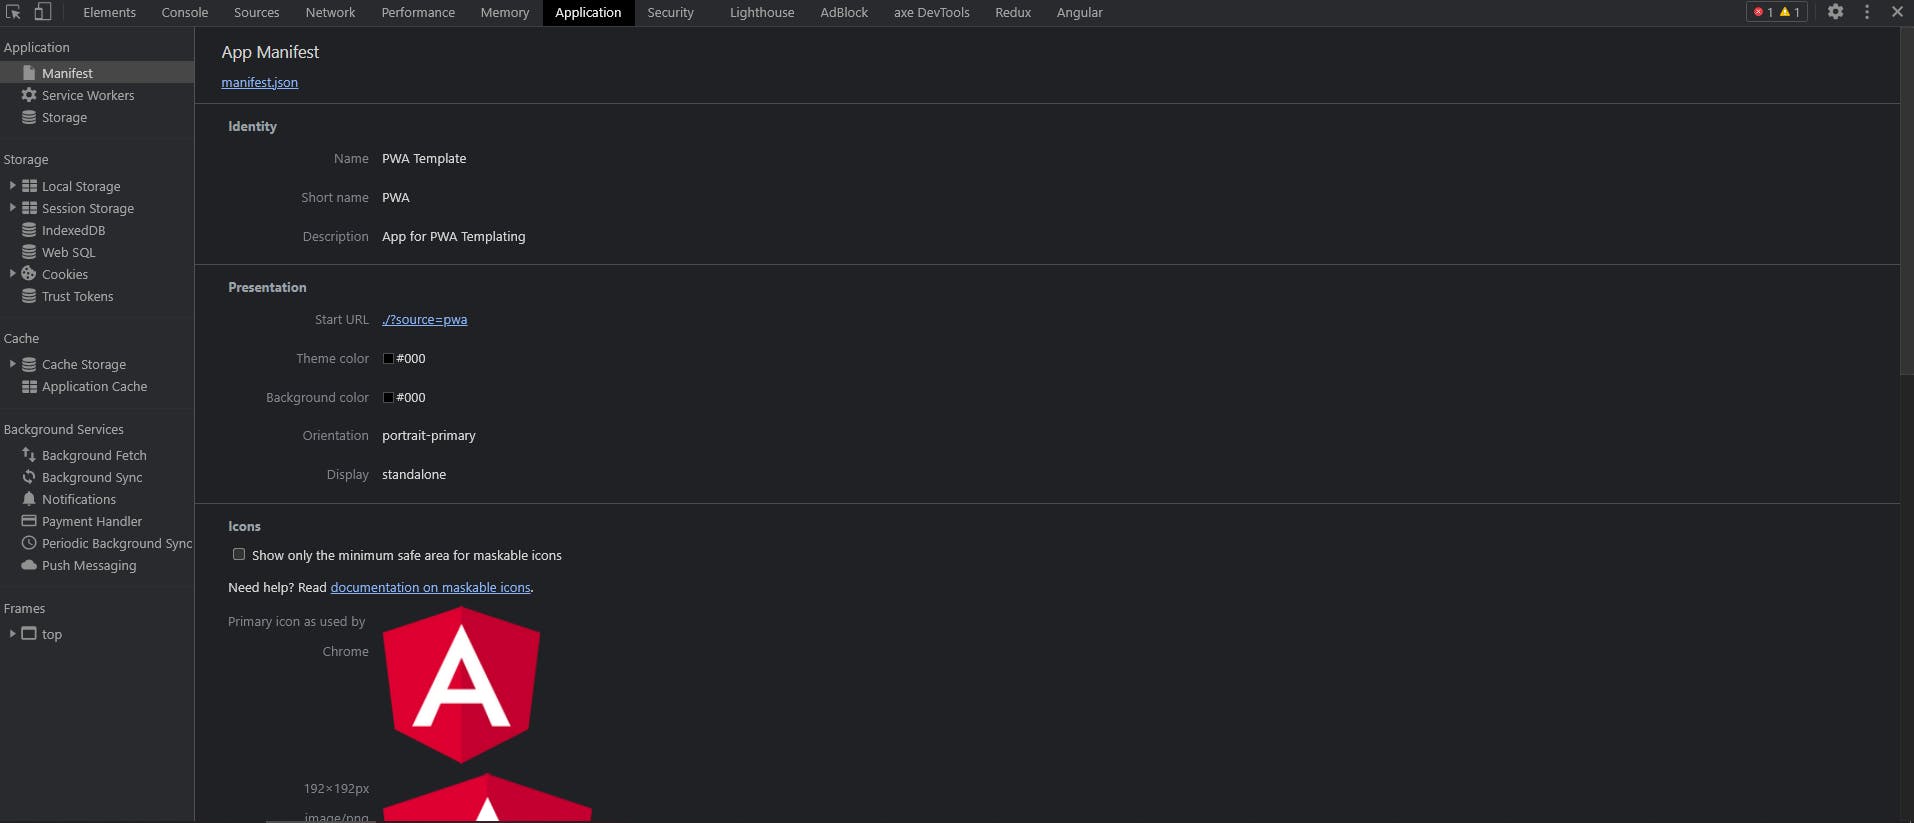
The web app manifest is a JSON file that tells the browser about your Progressive Web App and how it should behave when installed on the user's desktop or mobile device. and to show the Add to HomeScreen prompt. It is a required file for PWA.
Manifest files are supported in Chrome, Edge, Firefox, UC Browser, Opera, and the Samsung browser. Safari has partial support.
Let's create a manifest.json in the root directory. The manifest file can have any name but is commonly named manifest.json and served from the root (your website's top-level directory).
The specification suggests the extension should be .webmanifest, but browsers also support .json extensions, which is maybe easier for developers to understand.
{
    "name": "PWA Template",
    "short_name": "PWA",
    "icons": [
        {
            "src": "./images/Icon-192.png",
            "type": "image/png",
            "sizes": "192x192",
            "purpose": "any maskable"
        },
        {
            "src": "./images/Icon-512.png",
            "type": "image/png",
            "sizes": "512x512",
            "purpose": "any maskable"
        }
    ],
    "start_url": "./?source=pwa",
    "background_color": "#000",
    "display": "standalone",
    "scope": "./",
    "theme_color": "#000",
    "orientation": "portrait-primary",
    "shortcuts": [
        {
            "name": "Page 2",
            "short_name": "Page 2",
            "description": "Shortcut for Page 2",
            "url": "./page-2.html?source=pwa",
            "icons": [
                {
                    "src": "./images/Icon-192.png",
                    "type": "image/png",
                    "sizes": "192x192"
                }
            ]
        }
    ],
    "description": "App for PWA Templating",
    "manifestUrl": "./manifest.json",
    "lang": "et",
    "screenshots": [
        {
            "src": "./images/Screenshot1.png",
            "type": "image/png",
            "sizes": "720x461"
        }
    ]
}
 It is a
 JSON file as Package.json in a node project. In this some properties are mandatory and some are optional. But I Suggest adding as much as you can. Let's discuss them one by one.
name and/or short_name
You must provide at least the name or short_name When the app launch at some operating system it starts with a splash screen primarily on mobile devices. This name will be displayed on that screen. short_name is used on the user's home screen, launcher, or other places where space is limited. This is the name that will be shown underneath your app shortcut on the home screen
icons
This is the array on an object that contains icons images info that will be shown on the home screen, app launcher, task switcher, splash screen, and so on.
You can provide images in 8 sizes and the width and height should be the same. Sizes are 72, 96, 128, 144, 152, 192, 384, 512. According to Google, we should provide at least 2 icons of sizes as I provided. The browser will automatically scale the icons to fit the device.
Each object must include the src, a sizes property, and the type of image.
To use maskable icons, sometimes referred to as adaptive icons on Android, you'll also need to add "purpose": "any maskable" to the icon property.
start_url
This is the base URL of the app or if you want you can change it to any page that you want to open when the app opens. it usually either a slash or index.html file. It prevents the app from starting on whatever page the user was on when they installed or added your app to their home screen.
background_color
The color of the app background screen. When you launch the app this is the color of the background of the splash screen.
display
You can customize what browser UI is shown when your app is launched. We have 4 values i.e. fullscreen, standalone, minimal-ui, browser.
fullscreen: Open the application without any browser UI and cover the whole display by your app.standalone:Opens the web app to look and feel like a standalone app. The app runs in its window, separate from the browser, and hides standard browser UI elements like the URL bar.minimal-ui:This mode is similar to standalone but provides a minimal set of UI elements for controlling navigation like back and reload.browser: Simple Browser Experience
scope
The scope defines the set of URLs that the browser considers to be within your app. The scope controls the URL structure that encompasses all the entry and exit points in your web app. Your start_url must reside within the scope. If you don't include a scope in your manifest, then the default implied scope is the directory that your web app manifest is served from.
theme_color
Your theme color, people generally choose the color that they choose as the primary color of the website. It will be the color of the toolbar when you open the app and may be reflected in the app's preview in task switchers. The theme_color should match the meta-theme color specified in your document head.
orientation
It tells about the orientation you want when displaying the app.
shortcuts
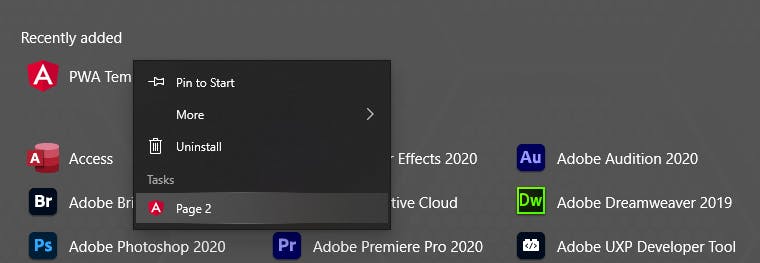 You can add shortcuts to the app for specific pages or links. It can be a part of your app as a mini project inside your website. Its main goal is to provide quick access. Each member is a dictionary that contains at least a name and a URL
description
You can write about your app in this property to describe your app
manifestUrl
It is the URL location of your manifest file is generally the root folder but sometimes according to requirement people also change it but it is recommended to put your manifest file in the root directory.
lang
The language or your app. for English the value is et
screenshots
The screenshots property is an array of image objects, representing your app in common usage scenarios. Each object must include the src, a sizes property, and the type of image. Width and height must be at least 320px and at most 3840px.
Add the web app manifest to your pages
After creating the manifest, we need to add it to all the pages on our Website.
index.html
<link rel="manifest" href="./manifest.json" />
<link rel="apple-touch-icon" href="./images/Icon-192.png" />
<link rel="apple-touch-icon" href="./images/Icon-512.png" />
<meta name="theme-color" content="#000" />
page-2.html
<link rel="manifest" href="./manifest.json" />
<link rel="apple-touch-icon" href="./images/Icon-192.png" />
<link rel="apple-touch-icon" href="./images/Icon-512.png" />
<meta name="theme-color" content="#000" />
Test your manifest
To verify your manifest is set up correctly, use the Manifest pane in the Application panel of Chrome DevTools.
Now the last and most important part of PWA
Service Worker
A service worker is a script that your browser runs in the background in a separate thread. That means it runs in a different place and is completely separate from your web page. That's the reason why it can't manipulate your DOM element. However, it's super powerful. The service worker can intercept and handle network requests, manage the cache to enable offline support, or send push notifications to your users. In the future, service workers might support other things like periodic sync or geofencing. This is such an exciting API because it allows you to support offline experiences, giving developers complete control over the experience. It's a JavaScript Worker, so it can't access the DOM directly. Instead, a service worker can communicate with the pages it controls by responding to messages sent via the postMessage interface, and those pages can manipulate the DOM if needed.
Let's create a Service worker in the root folder
serviceWorker.js
let CACHE_NAME = "animated-accordion";
let urlsToCache = [
    "/",
    "./index.html",
    "./style.css",
    "./script.js",
    "./images/Icon-192.png",
    "./images/Icon-512.png",
];

self.addEventListener("install", e => {
    e.waitUntil(
        caches.open(CACHE_NAME).then((cache) => {
            cache.addAll(urlsToCache);
        })
    );
});
It is a JavaScript file, we declare the name of our cache CACHE_NAME and the assets to store in the cache. self is an instance of server worker. A service worker has a lifecycle that is completely separate from your web page. as in the service worker file, we added an event listener for installation, so it gets triggered whenever the app gets installed and we store the cache. When the install event is fired, we run the callback, giving us access to the event object.
Caching something on the browser can take some time to finish because it's asynchronous.
So to handle it, we need to use waitUntil() which, as you might guess, waits for the action to finish. Once the cache is ready, we can run the open() method and create our cache by passing its name as an argument to caches.open(CACHE_NAME). Then it returns a promise, which helps us store our assets in the cache with cache.addAll(assets).
Now, we've successfully cached our assets in the browser. And the next time we load the page, the service worker will handle the request and fetch the cache if we are offline.
after this we need to fetch the assets in serviceWorker.js for that we need to make an event listener for fetch
self.addEventListener("fetch", e => {
    e.respondWith(
        caches.match(e.request).then(res => {
            return res || fetch(e.request)
        })
    )
})
The callback gives us access to fetchEvent. Then we attach respondWith() to prevent the browser's default response. Instead, it returns a promise because the fetch action can take time to finish.
And once the cache ready, we apply the caches.match(fetchEvent.request). It will check if something in the cache matches fetchEvent.request. By the way, fetchEvent.request is just our array of assets. Then, it returns a promise. And finally, we can return the result if it exists or the initial fetch if not.
Now, our assets can be cached and fetched by the service worker it will decrease the load time and increase the performance of our app. And it makes our app working well in slow connection or offline mode as well. During development, you'll be able to use service worker through localhost, but to deploy it on a site you'll need to have HTTPS setup on your server. To install a service worker for your site, you need to register it, which you do in your page's JavaScript. Registering a service worker will cause the browser to start the service worker install step in the background.
script.js
if ('serviceWorker' in navigator) {
    window.addEventListener('load', () => {
        navigator.serviceWorker.register('./serviceWorker.js').then((registration) => {
            console.log('ServiceWorker registration successful with scope: ', registration.scope);
        }, err => {
            console.log('ServiceWorker registration failed: ', err);
        });
    });
}
We start by checking if the service worker is supported by the current browser, Some browsers still don't support it. but don't worry most browsers and all the latest ones support it.
After that we are adding a load event on the windows object to register our service worker by passing the name of our file to navigator.serviceWorker.register() function as an argument.
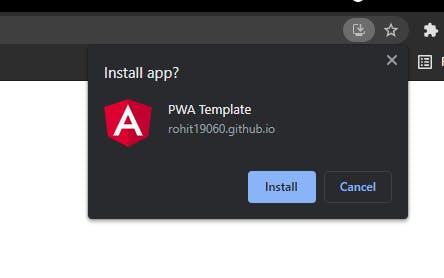
Now if you refresh your app you will see an install button or Add to home screen prompt in your browser. After that, you can install the app and it will get installed in a snap of a finger.
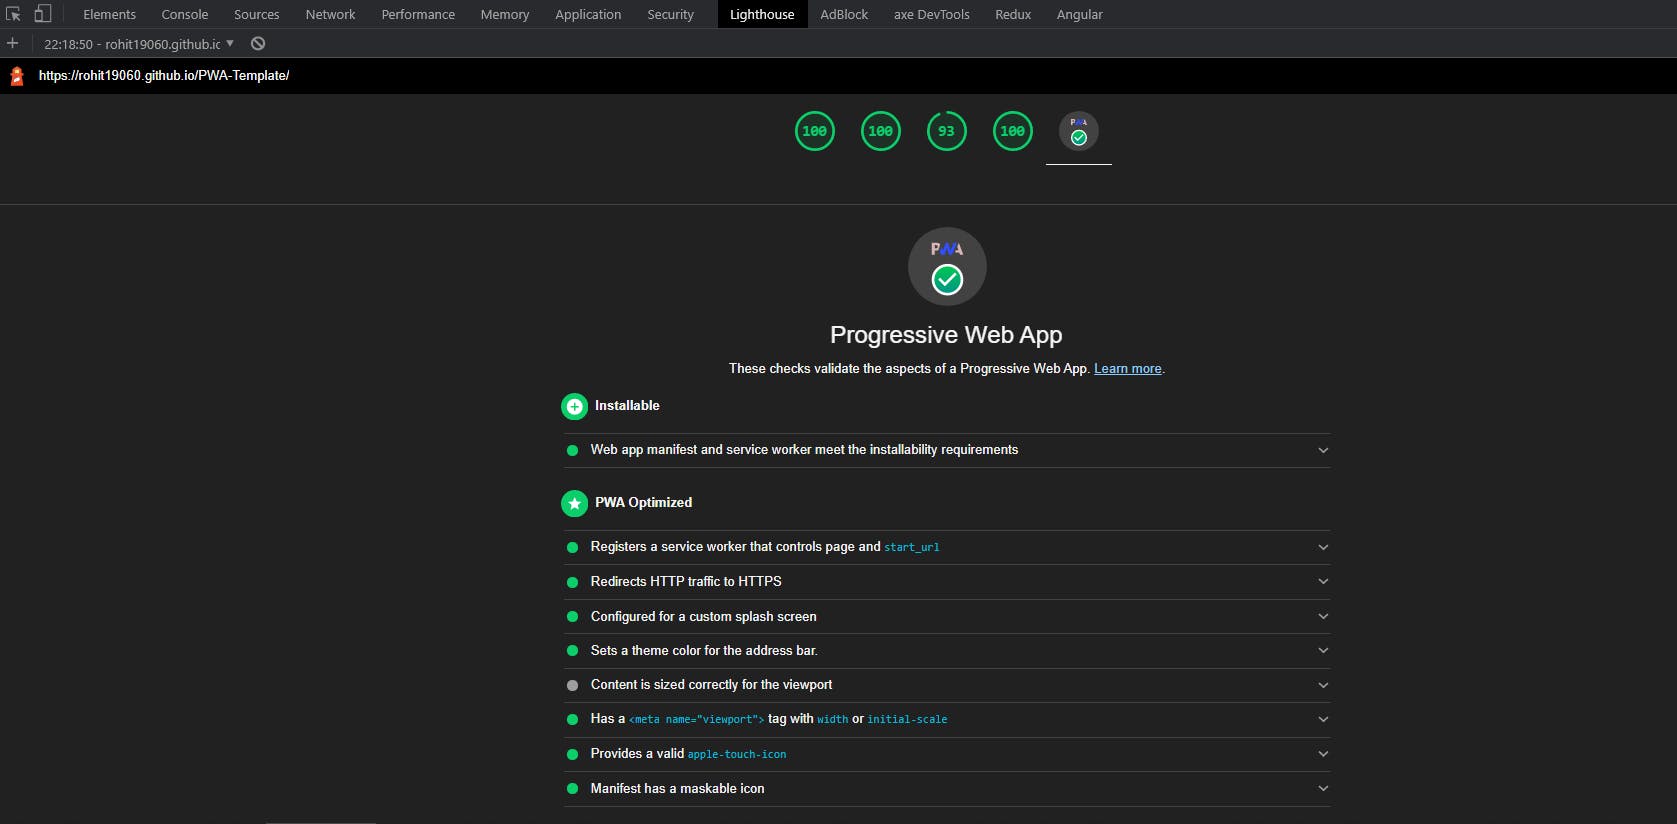
PWAs are progressive, Responsive, connectivity independent,app-like, discoverable,re-engageable, installable, linkable, fast, secure, reliable and increase the user experience a lot with that also give you offline support. Many frameworks out there now come with a service worker file already set up for us. But knowing how to implement it with Vanilla JavaScript can help you understand PWAs.
You can check the repo for code and live demo also.
Some reference links for more...