

CSS - Second Step Towards Web Development


Hey Guys, Welcome to CSS World where you can color the internet by using simple rules. You can create great stunning websites by using a couple of lines.
CSS is the second step in web development, the first is HTML 😎, CSS is much freer than HTML as there are a lot of ways to achieve the same thing. CSS stands for Cascading style sheet, it is used for the layout and designing of a web page.
The Anatomy of CSS Rules is quite simple: we have just 3 things i.e. a selector, a property, and respective value of the property. Let’s see that in action.

A selector can be a tag, id, class, pseudo-class, attribute, or universal selector. And inside curly braces, we write CSS rules in key-value pairs. A property can be a color, margin, padding border, or much more. There is an infinite number of properties to choose from. There is no need to get shocked. This is for us, an infinite number of properties will help us to make our CSS styles. We don’t need to follow anyone else. A property value is dependent on the property because every property in CSS has different values like margin has values in pixels or percentage, a color can be a color name or hexadecimal values.
Now how you use CSS on your website or webpage, There are 3 ways to define CSS that are:
Inline CSS, Internal CSS, or external CSS.
Inline CSS is used where you just need to give values to the particular element and it is defined inside the HTML start tag so, sometimes it’s also called ready-to-go CSS. But there are a lot of drawbacks of inline CSS as it makes it hard to differentiate HTML and CSS on a single page. And it also makes editing hard because you need to find that particular element to change something.

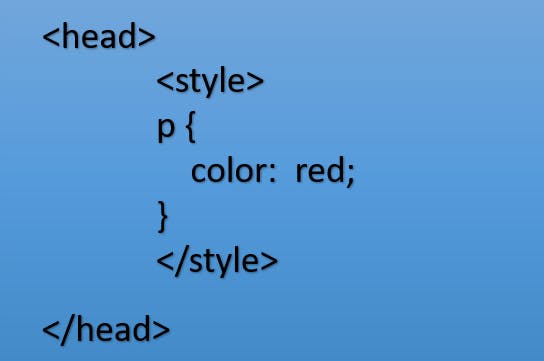
Internal CSS is used to don’t worry about anything just want to project done, and CSS is defined as the top in the head tag. But this is also not a good way to use CSS as this makes your webpage very long and that styles that you define on one page can’t be used in another webpage so it makes you write a hell amount of CSS for different pages and a lot of just is copy-paste. So it will increase your website's overall size so not an optimal solution.
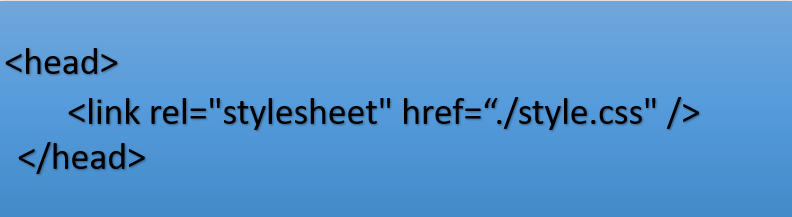
External CSS is used where you want to create a website that has a lot of pages then External CSS is the way to go. In this, you create a CSS file (.css) and write your all CSS rules set there and link it to your web pages. This helps us to achieve reusability.
style.css

index.html
Before starting with CSS you need to know a bit of a text editor like VSCode or sublime and a browser ie Google Chrome or Mozilla Firefox. With VSCode you can use a live server extension to make your development fast. The live server will help you by saving time in switching between text editor and browser and hitting the reload button every time you make a change in your webpage. When you use a live server you can just focus on the main things and whenever you save a file the webpage will get relayed automatically. You can also use the Vscode autosave feature So, you don’t need to save the files again and again.
There is a lot to talk about but talking is not a developer thing. It's writing code that makes a developer happy.
Let’s start by using a background-color property
Background-color as its name suggests changes the background color according to the value provided.
Body{
Background-color: red;
}
This will make your whole web page background color red. If you want to change the foreground property then the properties you need is Color yeah simple color property will change the foreground color as
Body{
color:#444;
}
This will change your text color to one of shades of grey.
For colors, we have a couple of ways to use them as value. You can use direct color name (red), Hexadecimal values (#444,#444444), RGB function (rgb(44,33,22)) or rgba function (a is for alpha or opacity rgba(44,33,22,0.5)).
Text-styling
Font-family you can use to change the font of your text, there are a couple of web-safe fonts you can use like Verdana, Geneva, Tahoma, etc. if you want you can use your font as well.
The font size you can use to increase or decrease the size of the fonts and this is generally used in pixels. By default this is 16px.
Font weight you can use to make the text bolder or lighter either by giving values in numbers as 100-900 or in the text as bold, bolder, etc.
You can use VScode IntelliSense to see all the values there are for the property.
Line-height you can use to increase or decrease the height of the line and for line-height value, we generally use values in em.
Word-spacing you can use to increase or decrease the space in between words you can create your awesome styles by using any combination of these properties.
Text-decoration you can use if you want to apply some decoration on a text like underline or line-through or overline as well.
Letter spacing you can use for putting space in between each letter. This will give your text a unique style.
Text-align you can use to make your text aligned in center and right as well by default it’s left. Heading and paragraph are block type tags and in the block, you can align things where you want.
Let’s talk about selectors
As I mentioned earlier there are 6 types of selectors:
Tag selector
You can use a tag as a selector and the styles in the curly braces will be applied on all the tags on the webpage.
Class selector
For class, you need to use a dot(.) and name of the class and this is the best way to define and control CSS because you have every control over it. If you want to apply the style then use the class attribute inside the HTML tag.
ID selector
For id, you need to use a Hash or pound sign (#) and name the id. It is unique and we use id only once. You should not use id twice, if you want a style to be applied to more than one element then use class.
Pseudo Class
We use pseudo-classes to achieve some extra functionality using CSS, like on hover, first-child, Last-child, nth-child, etc. there are a lot of CSS pseudo-classes. You can use them based on what you want to achieve. FOr using a pseudo-class you need to use a selector and color(:) as
selector:pseudo-class {
  property: value;
}
For example
a:link{
Color: #FF0000;
}
Attribute selector
We use attribute selector to select an element based on attribute as input[type="text"] will select all input elements of types text. Same as this we can use any attributes and apply styles to them.
Universal Selector
This is used to select every element and we generally use this to remove the default as there are some default margin and padding applied on elements and this makes it a bit hard to make changes so we use a universal selector to make a reset as
*{
Margin:0px;
Padding:0px;
}
Width and Height
You can change the width and height of the element according to you to make an awesome layout. By default, every element width height depends on the element and the content of the element. If the element is a block type element then the width is 100% and height is always according to the content. If an element is an inline element that both the width and height depend on content. You can change it by using these properties. There are also min and max properties for height and width as max-width, min-width, max-height, and min-height to make your webpage responsive.
We can use either value in pixels (non-responsive) or percentage(responsive).
Box model
In the box model, we have 3 main properties i.e. margin, padding, and border. And there are a lot of ways and styles you can use for the box model let’s go through them.
Margin
Margin is a space outside the element it makes space between two elements or elements and the browser wall. We use margin to make our webpage more spacious. For using margin there is a shorthand as well.
Shorthand means write small and achieve big and you can achieve the same by writing more as well.
There are properties like margin-top, margin-bottom, margin-left, margin-right for defining margins different but you can use just margin and give one value as margin:16px and this is applied on all the sides if you give there 2 values as margin: 15px 16px then 15px will be applied on top and bottom (x-direction) and 16 px will be applied on left and right(Y-direction). If you give their 3 values as margin 14px 15px 16px then 14px will be applied on top, 15px will be applied on left and right and 16px will be applied on bottom. And lastly if you give 4 values as margin: 14px 15px 16px 17px then 14 will be applied on top, 15 will be on right, 16 on bottom and 17 on left side as top right bottom left (clockwise).
Padding
Padding is space between element border and content. This is very helpful when you use text elements. Defining padding is the same as margin. You can use the same shorthand as margin in padding as well.
Border
The border is the line between margin and padding that is used to differentiate elements visually. And borders have a couple of extra properties such as border-style, border-width, border-color, border-radius and you have a shorthand for the border as well. You can use border: 2px solid blue and a 2 pixel solid blue Colored border will be applied on all the sides of the element. You can use a long way to override one of the values as border-bottom-width or border-left-style and you can also define them differently as border-left, border-right, border-top, and border-bottom.
Box-sizing
There is an argument about that this property is inside the box model or not but that does not change the use of the property by default every element is a content box that means the border’s width will be counted outside the content but you can make it border-box to make sure that width you provide will be applied what you give so the border will be counted inside that width.
List-styling
There are 3 types of list in HTML and in CSS we have specific styles defined for lists i.e. list-style, list-style-type, list-style-position and list-style-image. Using these properties and combining them with other properties you can create an awesome list. As you can give your image for the list or change the position of the list dots or image.
Display
By default, there are only 2 types of tag block and inline tags but with the display property, you can change them according to the requirement as display: block or display: inline, or if you want to hide an element you can do that by using none as display value.
Align & Float
These are quite non-usable properties now as these are used for creating layouts but managing these are very difficult and making them responsive even more difficult and we have very good and alternate solutions for that already that are flexbox or grid they make it very easy to for creating great and responsive layouts. But still, let’s see how we can use Float. The float is used to make the element aligned right instead of left. By default, every element is aligned left. But if there is space on right before the element then you can make it float right.
Positions
These are used to make your aligned position easy and robust. We can make our element anywhere using CSS positions. We have 4 main positions i.e. Relative, Absolute, Static, Fixed.
By default every element is static and there is nothing much about it. Position absolute is positioning based on any relative element. If you don’t specify any relative element then the absolute properties will use the web page as its parent element and position is based on that. If you make the parent element relative, you can make the child element position anywhere you want by utilizing left, right, top & bottom properties. Next, we have a fixed property and that is used to make an element position fixed i.e. scroll will not move the element.
Background
We have a lot of properties we can use to make our background stunning in CSS. We can use linear or radial gradients as our background and images as well. After that, we have a couple of background-repeat, background-size, background-position properties to support that background.
For using an image in the background you need to use a URL function as
Background-image: url(<image location>);
This is all you can do in the CSS Basics to make stunning web pages. Comment down below your favorite part about CSS